
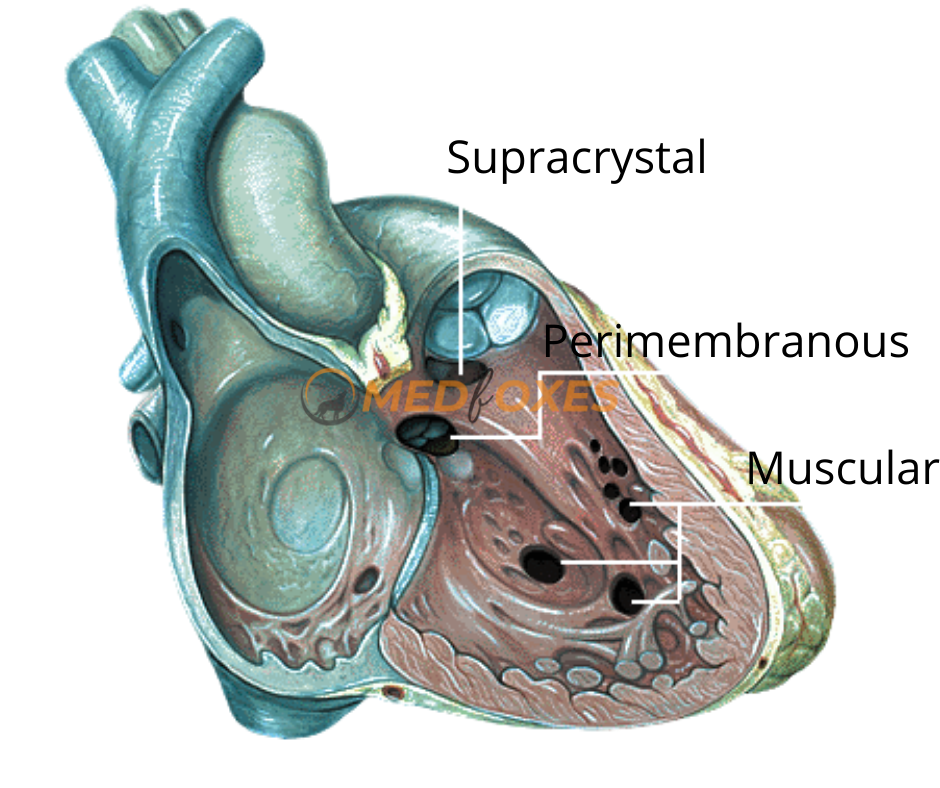
The use of a transcatheter device to congenital Ventricular Septal Defect Closure Is an appealing and practical alternative to surgery. Isolated congenital VSDs are the most prevalent type of congenital heart disease in children and babies, accounting for 25–35 percent of all cardiac abnormalities. The majority of VSDs are found in the ventricular septum’s membranous section. VSDs can also be seen in the muscular region of the heart, below the pulmonary valve, and around the Tricuspid and mitral valves’ junction (inlet VSDs).
Hardware’s Needed
- 5f Sheath – 1
- 6f Sheath – 1
- 6f Swan Ganz – 1
- 5f Pigtail – 1
- 0.035inch Teflon Amplazter stiff wire (260cm) – 1
- 5f RCA – 1
- 0.035 terumo wire (150cm) – 1
- Snare catheter – 1
- Amplazter Noodle wire double length (300CM) – 1
- Device delivery system (Preferable French)
- Pressure monitoring line (Male to Female) – 2
- Other things as like ASD closure
Sterile Preparation
- Both the sides of the groin to be prepared with antimicrobial solution
- Drape the patient with drape sheet
- Prepare big trolley & procedure table as for any other device closure procedure
- Pre catheterization TEE to be done to define the no, location & size of the VSD and relationship of these defect to the atrioventricular and semi lunar values
Ventricular Septal Defect Closure Procedure Steps
1. Venous & arterial access to be obtained
2.Through Venous access 6F Swan-Ganz catheter is to be introduced into the PA to measure the PA pressures & wedge pressure
3.Pressures to be recorded on appropriate scale & remove the Swan-Ganz catheter
4. Introduce the Pigtail catheter with 0.035 Teflon stiff wire into the Left Ventricle Remove Teflon wire & attach the pressure line
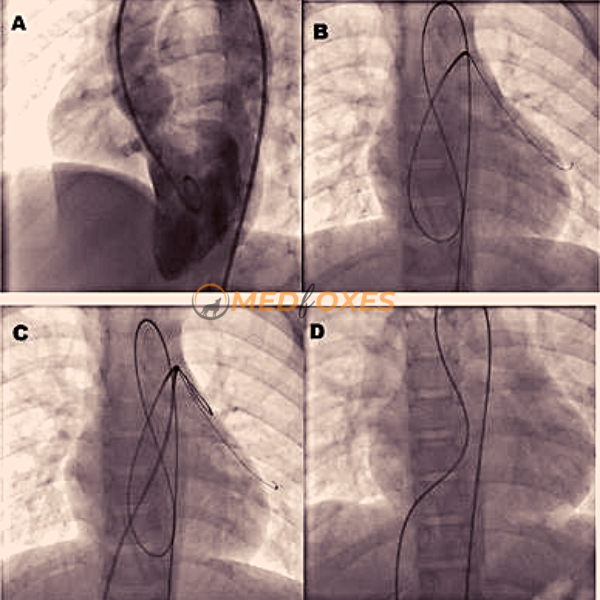
5.Monitor the pressure and Perform pressure injection in LV to define VSD (Flow Rate- 25ms, 16ml/sec 800psi , Imaging Angle- LAO 50. & Cranial 20.)
6. Then remove the catheter along with 0.035 Teflon stiff wire

Retrograde Wiring Technique
- Introduce RCA catheter with 0.035 terumo wire into the aorta to LV to RV to PA
- Track the catheter into the PA & remove the terumo wire put the double length Noodle wire
- Once the noodle wire is in PA remove the RCA catheter
Introduce snare catheter with RCA Catheter via venous to RA to RV to PA
Grab the noodle wire into the snare catheter, then advance the RCA catheter to tighten the share loop, by holding the RCA and snare firmly pull the noodle wire into RV-RA-IVC under fluoroscopy.
Now the noodle wire is out through the venous access
Antegrade Wiring Technique
- In this technique Swan Ganz catheter is advance into IVC-RA- RV- PA and snaring can be done from AO-LV-RV-PA, This technique helps to avoid Chordae Tendineae damage due to trapping of wire & Catheter in chordae, which is more common during wire exchange with other end hole catheters.
- In Antegrade Swan-Ganz technique, PA position of wire is achieved with inflated Swan-Ganz balloon. When balloon is crossing the Chordae on its inflated position, there may be a very less chance of trapping in chordae.
Once Swan Ganz catheter is in PA, noodle wire can be advanced through Swan into suitable pulmonary vein, Advance Snare with RCA Catheter from AO-LV, Across VSD into PA
Grab the noodle wire into the snare catheter, then advance the RCA catheter to tighten the share loop, by holding the RCA and snare firmly pull the noodle wire into RV-LV-AO under fluoroscopy.
Now the noodle wire is out through the Arterial access
Prepare the device delivery system
- Long sheath with dilator (flush the sheath by keeping vertically)
- Device introducer
- Device delivery cable

Device Loading
- Pass the device delivery cable through the device introducer and screw it (anti clockwise) with device
- Pull the cable till the device comes into the introducer by keeping under saline
- Flush multiple time with introducer side-arm to make complete Air- free Septal Device
Long Sheath Positioning and De- Airing
- Introduce the sheath and dilator via venous access over the noodle wire into RV to aorta
- Once sheath is across the VSD into the Aorta, the sheath dilator must be removed very carefully to avoid air trap into Coronary artery and other organs.
- In order to do this the sheath side arm port should be kept into a bowl of saline with its 3way open, once it’s completely inside the saline the sheath dilator alone can be pulled out slowly.
- Watch the Hemodynamics carefully during this process, If ST- Elevation noted, Administered high flow oxygen the ST – Elevation usually settle in 5min of time
7. Introduce device with loader & introducer into the sheath. Push device with loader up to the tip
8. Pull back the sheath into the LV & push the device
9. The sheath is then retracted allowing the distal portion of the device to unfold
10. The whole unit is slowly pulled back until the distal device fits snuggly against the defect in the LV
11. The sheath is further retracted allowing for the proximal device to unfold in the mid right ventricle
12. With the correct positioning of the device confirmed, the device is released by clock wise rotation of delivery cable and the delivery cable is pulled back to the sheath


13. A control LV angiogram is performed to confirm the closure of VSD with Pigtail
14. Measure LV systolic / diastolic, LV-EDP & pull back aortic pressure also to be done with pigtail
15. Measure PA pressure, PA wedge pressure & RV pressure with swans
16. Remove both venous and arterial sheath
17. Once the hemostatic is obtained, apply pressure bandage and shift the patient to ICU