

Angiogram Radial Approach – The most compelling reason for adopting Trans-radial access is the increased patient safety that results from the virtual elimination of access site bleeding and vascular complications. In addition, TRA is associated with early sheath removal, improved patient comfort, faster recovery, and lower costs in comparison with transfemoral access
Pre- procedure Assessment for Radial Angiography
Allen’s Test –
A “compression test” to diagnose arterial occlusion resulting from thrombo angiitis obliterans. The test consists of simultaneously compressing the ulnar and the radial arteries at the level of the wrist for approximately 1 or 2 minutes , the patient closes the hand tightly to squeeze as much blood out as possible, then quickly opens the hand and extends the fingers, then the operator releases compression of the ulnar artery and waits for the hand to regain color. In individuals with integrity of the hand circulation and a patent palmar arch, the pallor of the hand is quickly replaced by blushing of higher intensity than normal in about 5 to 9 seconds .
PRACTICAL NEEDED
- 20 Gauge jelco short
- 6F Radial sheath (7cm)
- 0.025′ Terumo Introducer wire (45cm)
- 0.035′ Terumo guide wire (150cm)
- 5F Tig catheter (for both coronary)
Angiogram Radial Approach Preparation
- Sterile Scrubbing, Gowning, Gloving
- Preparation Of Sterile Trolley
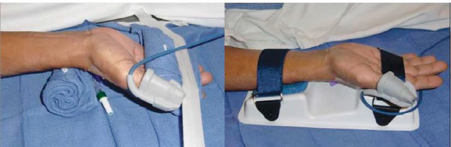
Hand position need to done properly – Positioning of the hand for Trans-radial access. The hand is hyper-extended with use of a rolled towel behind the wrist and tape holding the fingers or with use of a dedicated positioning splint.
- Painting – from middle ventral part of forearm to elbow and femoral region.
- Load 5ml of Xylocaine in 5ml BD syringe and Heparin 2500 I.U in 5 ml BD syringe
- Flush the puncture needle, sheath, and dilator and TIG Catheter for Both Left and Right Coronaries.
- Prepare manifolder
- First port with Pressure line
- Third port with contrast
- Attach 10ml luer-lock syringe

Angiogram Radial Approach Procedure
- Puncturing Radial artery with puncture needle (20 G)
- Introducing 0.25′ Terumo introducer wire
- Removing puncture needle
- Making a small incision with scalpel blade
- Introducing the sheath with dilator
- Remove the dilator with wire & flush the sheath, Administer 2500 IU of Heparin
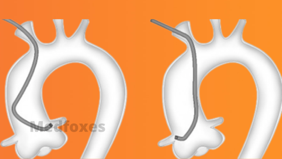
- Introducing LCA catheter with 0.035 Teflon guide wire
- Introduce the wire till it reaches the ascending aorta & hold the wire till the catheter reaches the ascending aorta then remove guide wire
- Aspirate 1 ml of blood in 5 cc empty syringe & flush the catheter with heparinized saline
- Connect manifolder to the catheter, Aspirate some blood & flush
- Open the pressure line & aspirate contrast.
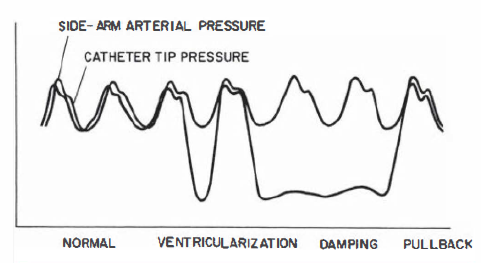
- Check whether the catheter hooks the coronary artery by giving small test injection and open the pressure line to check pressure damping
- Inject contrast 4 – 5 ml for three cardiac cycle
- Once LCA Injections over, Same catheter can be used to cannulate RCA
- Once it is hooked, Give test injection then inject only 2-3 ml contrast
- For LIMA injection 5-6 ml of contrast to be injected
- Remove the catheter, sheath, check hemostasis & apply pressure bandage
Angiographic Views
The left coronary artery
1 . RAO-caudal to visualize the left main, proximal LAD, and proximal circumflex
2. RAO-cranial to visualize the mid and distal LAD without overlap of septal or diagonal branches
3. LAO-cranial to visualize the mid and distal LAD in an orthogonal projection
4. LAO-caudal to visualize the left main and proximal Circumflex
The Right coronary artery
l. LAO to visualize the proximal and mid right coronary artery (RCA)
2. LAO cranial to visualize the distal right coronary artery and its bifurcation into the posterior descending and posterolateral branches
3. RAO-cranial to visualize the posterior descending and posterolateral branches
4. Lateral to visualize the mid-RCA
Sheath Removal
The vascular sheath is always removed at the end of the surgery, regardless of the amount of anticoagulant or anti-platelet therapy, which is a significant benefit of the Trans-Radial Approach. Multiple methods for radial haemostasis have been described. Gentle manual compression with one or two fingers at the arteriotomy site is an effective technique.
Alternatively, a rolled piece of gauze can be located longitudinally at the arteriotomy site and covered with an elastic bandage or a hemo-band around the wrist to maintain prolonged haemostatic pressure. Because of the inability to monitor the haemostatic pressure, these approaches have the disadvantage of completely interrupting arterial flow. The longer the occlusive pressure, the greater the rates of Radial artery occlusion, according to research.
The TR Band, for example, is a balloon-based haemostatic device that applies selective pressure to the radial artery and allows precision haemostatic pressure adjustments as well as direct visibility of the arteriotomy site through the transparent balloon material